
You can remove this guy from your daily life with a digital declutter.
In December I was contemplating buying a new laptop. My four-year-old MacBook Pro was giving me the rainbow pinwheel constantly and my workflow had slowed to crawl.
Unprepared to drop $1000 for a new computer, I consulted several tech-nerd friends who suggested clearing as much as possible off the hard drive, installing more RAM and running the built-in disk repair utility. In the process of doing all that I came to the conclusion that rather than winnowing down all the junk I’d just start fresh, by erasing the hard drive and returning the laptop to its factory settings. And I can’t believe how happy I am with the decision to do so.
Yes, computers get faster and lighter all the time (the one thing that I can’t change about mine is to make it weigh less when I’m lugging it around). But the notion that you should replace your technology every few years, just because, is silly. If you’re working day in, day out on something incredibly memory intensive, like video or audio editing, new equipment may be in the cards on a regular basis. Small improvements in speed actually make a difference to you. But for those of us who work mostly “in the cloud”–on web-based applications like WordPress, GoogleDocs and over email–a sluggish machine has more to do with maintenance than anything else.
So embrace my digital declutter and send your dollars somewhere other than Cupertino. Think of it as a juice cleanse or a massive spring cleaning–but with digital clutter. All those photos, new iterations of software, podcasts, PDFs, they add up over time, eventually slowing your computer way, way down. You can sort through and try the winnowing method first, but why? Moore’s Law is real–data storage is SO cheap now. You can get an external drive with a terabyte of space for something like $60. Having an external drive is a great way to get yourself into the habit of using Time Machine to back up your data (just think, you won’t be at the mercy of web blackmailers if they somehow manage to hold your data hostage), and unlike your closet, you really can just dump all your digital garbage on a drive and not look back until you need to grab a photo from your 2008 trip to Montreal (okay, there are much better ways to manage all your photos, but this is not that article), or that spreadsheet of addresses you’ve been meaning to add to your cloud-based address book.

You can do it, you can click erase.
A few caveats before we begin: This is about Macs, I cannot speak to how well this would work on revitalizing a non-Mac machine, or how you would go about that. Also, I am going to point you to where to figure out how to do this properly for your particular computer and give you some supportive pep talking along the way. I am not going to tell you what to click and when. And, if you’re selling your computer, you might want to look into what the IT dudes call seven-pass erase–OS X even comes with an option to erase to national security standards. So you can fancy yourself a real tech bad ass for a moment or two.
What you need:
- An external drive–get a terabyte, they’re like $60
- Additional RAM, which will cost something like $75 (this is optional, but helpful)
- A 00 screwdriver to open up your laptop (less than $5, only necessary if you’re upgrading RAM)
- Patience and time–this will take a few hours
What you need to know:
- Everything will be gone. Everything. That means, if you rely on cookies to remember passwords or don’t have access codes for gmail you should take a few minutes and write them all down and fix that. If you have a Google account, Chrome will “remember” you when you sign in. But take this opportunity to clean out your extensions, bookmarks and preferences. That’s the whole point of digital decluttering.
- You need to be connected to wifi to re-install OS X and get back up and running. So, make sure you have a good connection and that you know the password. This step will take AWHILE so plan on entertaining yourself without a computer for about an hour.
- You’ll have to reinstall everything, including Chrome, Firefox, Flash, Adobe Reader–anything that does not come standard with a Mac. You will have to re-install printer drivers, re-discover bluetooth devices. This can be irritating.
- If you have important software that you paid money for, like Adobe Creative Suite or FinalCut, make a plan for re-installing. You may want to start fresh by re-installing from a disk, or downloading the latest version afresh. But you will want to have any access codes and passwords ready to go.
- If your iTunes library is important to you, you will want to reload that from your backup on the external drive. This may also be irritating.
To get started, you will need to know things you may not, like which version of OS X you’re running and the specific model you have. Just click on the apple icon on the top left of your tool bar at the top of your screen, then click About This Mac. That will tell you everything, from when your Mac was made to how much RAM you are using and if there is room to install more. And, keep in mind that there’s a reason you’re using a Mac that goes beyond good marketing. All of these steps may seem tricky, but basically, your computer will prompt you how to set it up at every step–just like when you bought it and fired it up for the first time.
Step one: Make a back-up using Time Machine. This is super simple and you should be doing it anyway, every month or so. Or week if you produce a ton of stuff you wouldn’t want to lose, stored only on your computer every week. It’s responsible, hacker-thwarting and you can watch something dumb on TV while it’s working.
Step one-and-a-half: Not sold on my total computer cleanse? Here’s your opportunity to wuss out and go with some half measures. If that sounds like you, spend the next hour or so trashing files. Get rid of those photos you didn’t even mean to take but were uploaded from your phone during sync, software you downloaded and never used and other junk. Get rid of photos you want to keep–they’re on your external drive now, remember? Now go to disk utility ( Finder>Go>Utilities>Disk Utility) and repair your disk. This basically defragments your hard drive–reorganizing your data so the space is used more efficiently. The Mac tutorial makes this sound difficult, but it’s relatively simple. If the Apple help pages are confusing, just google for another option–there are a ton of YouTube tutorials and other resources that are often much easier to follow than Apple’s own documentation. For disk repair, I like this one. If you want something more technical, try here. Once you’ve repaired your hard drive skip ahead to step four and install your RAM. If disk utility told you something could not be repaired, or you’re already maxed out on RAM, you may want to take a deep breath and commit to erasing.
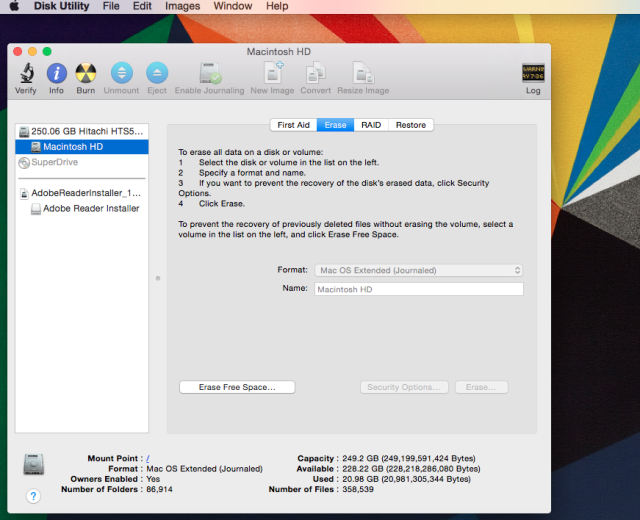
Step two: Erase that hard drive. This will take place in Disk Utility (Finder>Go>Utilities>Disk Utility), and here are the official Mac instructions. This article is also very helpful–and it will also help you make better use of your computer if you decide you want to do something like partition your hard drive for big projects (cloud workers, don’t worry too much about this). Take deep breaths and remember the following: your computer will guide you through this. You can restart from your Time Machine backup if, at the end of all this you decide that you want all your comfortable old junk back. This whole process, depending on how securely you erase your hard drive, will take about an hour, then, upon restart, you will likely be prompted to install a fresh, new updated version of OS X. Plan on another hour or two for download and installation of that.
Step three: Reinstall only what you really need. Still using Safari? You’re pretty much good to go. Chrome and Firefox users will need to download new versions of your preferred web browser. You’ll need to set up your bookmarks and things like that, start up iTunes and connect to your account to reload your podcast subscriptions and manually reload your library from back-up, reinstall software like Microsoft Office and Photoshop (you can do this from your backup, or from disk or web, it will depend on what you purchased). I would recommend going at it like this: plan on needing to download and install things over the next few weeks, but only do that as prompted or as your want them. It will cut down on the clutter on your hard drive, which is why you’re doing this.
Step three-and-a-half: Take this opportunity to really set up your web browser. Arrange your bookmarks and extensions how you want them. Set your security and permissions how you like, and create a default download folder that you can easily clear out once a week, to avoid future digital clutter.
Step four: Install new RAM. This is optional, and maybe you’re already maxed out on RAM, or, if you bought an external drive, maybe you don’t want to spend another $75. That is totally cool, just skip to step five. This requires you to open up your computer, which may seem scary. Let me be clear, at least on a laptop, this is very, very easy and you will not break your computer. Unless you spill and entire glass of water on it while the back is off. Don’t do that. Pro tip: get some canned air and clean the dust out while you have the thing open. Here are Mac instructions for all kinds of MacBook Pros, similar pages exist for pretty much every Mac product ever made. I also recommend watching a tutorial on YouTube (searching using your model name and date, which you found at Apple menu> About This Mac) or reading a tutorial with lots of photos like this one, for a visual aid. Pro tip two: the Apple instructions will tell you that the new RAM will “click” into place. It might not, especially on the bottom slot. It might just sort of settle into place. Check to see that the card is all the way in–you cannot put it in the wrong way, so don’t worry about that–you’ll be able to eyeball whether it’s in there evenly, don’t be afraid to push it firmly into the slot. I’d also recommend pulling up the instructions on your phone or tablet to reference, and remember to power down your computer before you take it apart.
Step five: Enjoy your “new” computer. Mine runs faster than it has since I first bought it in 2010. Do I wish it weighed less? Sure. But really, what’s a few ounces? Use this opportunity to create better digital housekeeping systems, regularly backing up your machine, syncing your other devices, creating a photo storage system and dumping junk you’re not using. And whenever you have to pause to install Adobe Reader or print drivers, just think about the $1000 you didn’t spend.


I am a little surprised there is no mention of upgrading to a solid state drive (SSD).. Makes the computer 10x quicker.
That is another excellent to get more performance out of a computer–it just didn’t fit into the scope of this article. The emphasis here is, Trash your digital junk, upgrades are the secondary concern.